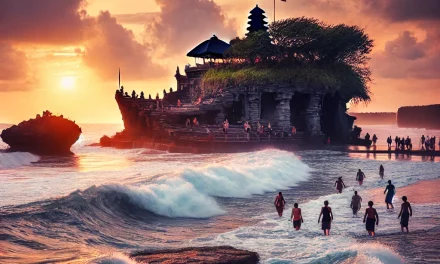
Ah, Tanah Lot. You’ve probably seen its stunning silhouette against the evening sky plastered on Instagram feeds or travel magazines. As the sun dips into the Indian Ocean, painting the sky hues of orange, pink, and purple, it sets the stage for one of the most breathtaking views I’ve ever encountered. Whether you’re a seasoned photographer or a casual snap-happy traveler, capturing the perfect sunset shot at Tanah Lot is an experience that blends creativity with pure magic. Let me take you through my journey and provide you with some practical tips on how to make the most of your photography adventure here.
The Allure of Tanah Lot
Before we dive into the nitty-gritty of photography, let’s talk about why Tanah Lot deserves a spot on your travel itinerary. This iconic sea temple, perched atop a rock formation, is a stunning landmark that’s been revered by Balinese culture for centuries. The backdrop of the vibrant sunset makes it an unparalleled location for photographers. I remember the first time I visited Tanah Lot—my heart raced as I approached, the salty breeze tousling my hair, and the dramatic waves crashing against the rocks felt like a scene straight out of a movie.
Timing Is Everything
Best Time to Visit: The golden hour before sunset is your best friend. But here’s the catch: you need to arrive at least an hour in advance to secure that perfect spot. On my first visit, I underestimated the popularity of the location. I arrived just 30 minutes before sunset, and I had to squeeze into a space surrounded by tourists. While I still managed some good shots, I learned my lesson the hard way. So, get there early, stake out your spot, and soak in the atmosphere.
Pro Tip: Check Sunset Times
Before your visit, check the sunset times for the day you’re planning to go. Apps like Sun Surveyor can help you pinpoint exactly where the sun will set, ensuring you get the angle you want. I found that information invaluable for planning my shots.
Composition is Key
Once you’re at Tanah Lot, take a moment to appreciate your surroundings. You’re not just photographing the temple; you’re capturing an entire scene. Think about the elements you want to include. Often, I find that foreground interest makes a huge impact.
Using Foreground Elements
One of my favorite shots from Tanah Lot includes the rugged rocks in the foreground, leading the eye towards the temple and sunset. You could include palm trees or even fellow tourists (if they’re in a picturesque pose!). Remember, layering in your composition creates depth and visual interest.
Rule of Thirds
The rule of thirds is a classical photography technique that works wonders in landscapes. Imagine dividing your frame into a 3×3 grid. Place the horizon along the top or bottom line, and position Tanah Lot off-center to create a more dynamic image. It’s a trick I use often, and it’s never failed me!
Gear Up: What You Need
Now, let’s talk gear. You don’t need the most expensive camera to get great shots; even a smartphone can produce stunning images if you know how to use it.
Recommended Gear
1. Camera: A DSLR or mirrorless camera will give you the best quality, but a good smartphone will do in a pinch.
2. Tripod: If you’re serious about photography, a tripod will stabilize your shots during low-light conditions. On my last trip, I captured some long-exposure shots of the crashing waves, which would have been impossible without a tripod.
3. Lens: A wide-angle lens (like a 10-20mm) is perfect for landscape shots. If you have telephoto capabilities, it can also help focus in on the temple details.
4. ND Filters: Neutral density filters can help manage exposure during sunset. I found that using one allowed me to maintain sharpness in both the sky and the foreground.
Mastering the Shot
As the sun begins to set, take multiple exposures. The light changes rapidly, and what looks good one moment can shift drastically the next. Don’t hesitate to play around with different angles and compositions! I often find myself moving around, trying different perspectives, and I’ve ended up with surprising results.
Shooting in RAW
If your camera allows it, shoot in RAW format. This gives you more flexibility when editing later. I still remember editing my Tanah Lot shots; the RAW images held so much detail that I was able to pull out colors I didn’t even know I captured!
Focus on the Sky
Okay, here’s a golden nugget I learned after one too many missed opportunities: focus on the sky. The colors during sunset can be breathtakingly beautiful, and if you concentrate your composition there, you can create a truly dramatic effect.
Proud Moments: Share Your Work
After a long day of shooting, you’ll have a plethora of sunset photos, but the joy doesn’t end there. I love to share my Tanah Lot images on social media, often pairing them with stories about my experiences. It’s not only fun to showcase your work but also a great way to connect with other travelers. Don’t forget to tag the location and use relevant hashtags to reach a wider audience!
Final Thoughts
Visiting Tanah Lot for sunset photography is an incredible experience that combines natural beauty with cultural significance. Approach it with patience, creativity, and respect for the environment around you, and you’re bound to capture something truly special. Next time you plan to visit, remember my tips—arrive early, experiment with your settings and compositions, and most importantly, savor the process! So, when are you heading to Tanah Lot? Pack your gear and get ready to make some memories! 🌅


