
Visiting Bali is like stepping into a postcard, filled with lush scenery, stunning sunsets, and vibrant culture. Among the many beautiful locations on the island, Tanah Lot stands out as a must-visit destination for photography enthusiasts. If you’re based in Ubud, embark on this photographic adventure to capture the beauty of Tanah Lot. Here are some tips that blend practical advice with personal anecdotes and unique insights to help you make the most of your photography experience.
The Magic of Tanah Lot
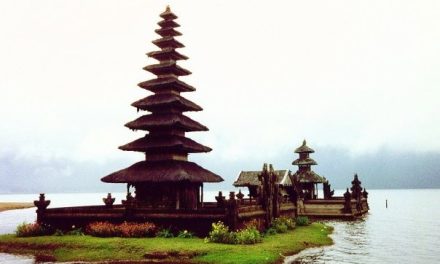
Before diving into the nitty-gritty of photography, let’s set the scene. Tanah Lot is famous for its breathtaking sunsets and the iconic sea temple perched on a rock formation. When I first visited Tanah Lot, I was in awe of the way the temple seemed to rise from the ocean, draped in mist during the twilight. I remember scrambling to find the perfect angle when suddenly, the sky exploded into hues of orange, pink, and purple—it was magical!
Planning Your Visit
When to Go
Timing is everything in photography. I recommend aiming for the golden hour—roughly an hour before sunset. The soft light adds warmth to your photos and enhances the colors of the temple and surrounding waters. If you’re catching the sunset, be sure to arrive early. On my first visit, I underestimated the popularity of the location and ended up battling crowds for a good spot. Arriving around 4 PM allows you to scout locations and set up your shots.
Getting There
Ubud’s central location makes it relatively easy to get to Tanah Lot. Renting a scooter is a popular choice, allowing you to take in the beautiful rice paddies along the way. However, if you’re not comfortable navigating the Balinese roads, consider hiring a driver for a more relaxed experience. On one occasion, I shared a ride with a fellow traveler, and we got to know each other while enjoying an impromptu karaoke session in the car—a memory that made the trip even more enjoyable!
Camera Gear Essentials
What to Bring
While it’s tempting to bring every piece of gear in your arsenal, simplicity is key. Here’s what I recommend packing for Tanah Lot:
– DSLR or Mirrorless Camera: For quality images and versatility.
– Wide-Angle Lens: To capture the stunning landscapes—my favorite was a 10-18mm lens that allowed me to frame both the temple and the vast ocean.
– Tripod: Essential for long exposure shots during twilight. I’ve learned the hard way that a shaky camera at sunset can ruin a perfect shot.
– ND Filters: If you’re looking to smooth out the water for that magical silky effect, a neutral density filter is a game-changer.
Composition Techniques
Rule of Thirds
Don’t place the temple smack in the center of your frame. Instead, use the rule of thirds. Imagine dividing your image into a grid of nine sections and place the temple on one of the lines or intersections. This simple technique can transform your photos from ordinary to outstanding.
Leading Lines
Incorporate leading lines to draw viewers into your image. On my last visit, I used the rocky shore and the waves leading up to the temple, guiding the viewer’s eye through the frame. Whether it’s the coastline or the trails around the temple, look for natural lines that lead to the subject.
Experiment with Angles
Low Perspective
Get down low to capture the temple with the ocean waving gently around it. I remember lying on the ground, waiting for the right moment when a wave splashed against the rocks, creating a dynamic shot that showcased both the temple’s grandeur and the surrounding sea.
Silhouettes
As the sun sets, consider capturing silhouettes of the temple. The striking contrast can create dramatic photos. During one particular sunset, I positioned myself perfectly to catch the temple against a flaming background, creating an image that still hangs proudly in my living room.
Engage with the Environment
Photography is about storytelling. As you snap away, take a moment to observe the surroundings. The locals performing rituals, children playing at the beach, and the occasional surfers all add life to your shots. I often find the most memorable photos come from spontaneous moments—like the time I captured a group of locals laughing while preparing for an evening ceremony at the temple.
Post-Processing Tips
Once you’ve captured your images, don’t shy away from some editing to enhance their appeal. Simple tweaks can drastically change your photos:
– Adjust the exposure and contrast to make the colors pop.
– Crop your photos to emphasize key elements, especially if you’ve shot with a wide-angle lens.
– Consider using Lightroom for batch editing and to apply presets to achieve consistent styling.
Conclusion
Visiting Tanah Lot from Ubud is an unforgettable photographic adventure! Embrace the local culture, explore different angles, and don’t forget to enjoy the moment beyond the lens. You never know when you’ll capture that perfect shot or create lasting memories with fellow travelers. With these photography tips in mind, you’re armed to capture the enchanting beauty of Tanah Lot. Now grab your camera, head out, and let the magic of Bali unfold through your lens! Safe travels, and happy shooting!


